
Expert Corner
How I perform a Total Hip Replacement
 SICOT Active Member - Harlow, United Kingdom |
Introduction
I perform a primary Total Hip Replacement (THR) using the posterolateral approach. This is the most commonly used approach for a routine primary THR. Austin Moore first described the currently used posterior approach [1]. He utilised the distal part of the original descriptions by Von Langenbeck and Theodor Kocher [2]. The advantages of the posterior approach include its simplicity, offering an excellent exposure to both the acetabulum and proximal femur with the potential to be extensile while preserving the abductor musculature [1,3]. I perform a mix of cemented, uncemented and hybrid (uncemented acetabular component and cemented femoral component) THRs. The most common bearing I use is a metal on highly cross-linked polyethylene with the occasional use of ceramic bearings. The rationale behind the choices depends on numerous variables. As a general rule, I use cemented components in patients over the age of 65 years. I use the Exeter V40 Femoral stem and the Exeter Contemporary cemented acetabular component (Stryker, Mahwah, NJ, USA). Both have excellent results as is evident in the National Joint Registry of England and Wales 2015 [4] and the recent publication of Maggs et al [5]. In patients between the ages of 55-65 years I tend to use an uncemented acetabular component – the Trident (Stryker, Mahwah, NJ, USA) in combination with a cemented Exeter V40 femoral component as a hybrid THR. This combination has a cumulative revision rate of 2.3% at 10 years [4]. In patients younger than 55 years I use uncemented components in the form of Corail/Pinnacle combination (DePuy-Synthes, Warsaw, Indiana, USA) with ceramic bearings. The combination of Corail/Pinnacle with a ceramic on highly cross linked polyethylene has been shown to have the lowest revision rate of 2.14%, which is lower than the 2.7% revision rate of the cemented Exeter system at 10 years [4].
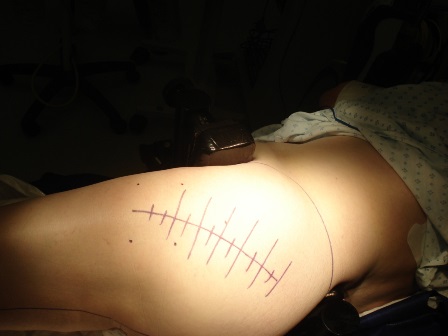
Figure 1: Superior view of patient positioned for a left THR with the Stulberg Hip Positioner and skin incision being marked.
SURGERY
Positioning
After administration of the appropriate anaesthesia, with intravenous cephalosporin and tranexamic acid 1gm at induction [6], the patient is placed in the lateral decubitus position on the operating table with the operative side up. A variety of hip positioning devices are available to use. I use the Stulberg Hip Positioner [7]. The aim is to position the patient perpendicular to the table using the sacrum as a guide. The positioner is attached to the table using existing table adapters. The pads are attached to modular upright posts utilising a single pad on the sacrum and double pads anteriorly to both anterior superior iliac spines (Figure 1). The posts are radiolucent and therefore facilitate radiographs on table should it be required. The torso may be stabilised with further supports if required to prevent tilt of the patient. The bony prominences are padded and protected.
Draping
The hip incision is marked along with transverse marks perpendicular to the skin incision (Figure 1). This allows for accurate closure of the incision. The incision is centered on the trochanter. The lower limb is prepped in a sterile manner using chlorhexidine skin prep. The foot is not prepped. It is covered in a sterile stockinette to just above the knee and wrapped in a sterile 6-inch crepe bandage. Sterile hip drapes are then used to isolate the hip to be operated. The exposed skin is then draped with a simple adhesive skin barrier. Iodine impregnated adhesive barrier may also be used.
Surgical Technique
A curvilinear incision is made with a skin knife centred on the greater trochanter. The length of the incision varies depending on patient habitus and the need to get adequate exposure. The superior aspect of the incision curves posteriorly towards the posterior superior iliac spine while the inferior part is in line with the femoral shaft.
After the skin incision the rest of the exposure is continued using diathermy. The subcutaneous tissue dissection is continued until the fascia lata is visualised. Minimum stripping of the subcutaneous fat is undertaken. Excessive stripping results in the formation of a dead space and possible fat necrosis. Transverse marks are drawn on the fascia lata using a marker pen. This is to help with accurate closure of the fascia. A separate deep knife is used to incise the fascia lata along the centre of the femoral shaft and extended proximally over the gluteal fascia. The underlying muscle is split posteriorly using a blunt instrument such as a closed forceps or scissors. Excessive splitting will result in muscle denervation and bleeding so care must be taken while performing this.
Swabs are used to protect the skin and a self-retaining retractor like a Charnley retractor is used to retract the incised fascia. Care is undertaken to make sure that the sciatic nerve is not entrapped in the prominent spikes of the retractor. This exposes the abductors anteriorly, the short external rotators posteriorly, the gluteus maximus insertion into the femoral shaft inferiorly and sometimes the sciatic nerve becomes visible in the depth of the wound. The gluteus maximus tendon is identified close to its insertion. This is incised using cautery. This helps to reduce the pressure on the sciatic nerve during flexion and internal rotation maneuvers. Care must be exercised while performing this, as a branch of the perforating artery is present. Sharp dissection is undertaken to expose the posterior aspect of the gluteus medius. A retractor is used to retract the muscle anteriorly. Care is taken not to damage the muscle. This exposes the short external rotators. The piriformis tendon is identified. This may be adherent to the gluteus minimus. The piriformis is separated along its length close to the trochanter and the rest of the short external rotators to the quadratus femoris are incised along with the capsule from the posterior aspect of the trochanter. The ascending branch of the medial circumflex femoral artery which comes into view during this step along with the retinacular vessels is cauterised. A flap is developed for repair at the end of the procedure. This flap is then retracted with stay/tag sutures and clips. A minimum of two is used to incorporate the short external rotators and the capsule. This in addition allows protection of the sciatic nerve. The gluteus minimus muscle is now identified just below the gluteus medius. This is gently elevated to expose the capsule. A superior capsulotomy is undertaken using either a sharp scissors or a knife. This now facilitates dislocation of the hip joint using a flexion, adduction and internal rotation maneuver. With the leg held in that position retractors are now placed along the femoral neck to protect the soft tissues. A reciprocating saw is used to perform a femoral neck osteotomy at the desired templated level. The femoral head is now removed. The leg is returned to its neutral position.
A bone hook is used to elevate the femur at the level of the trochanter thereby exposing the acetabulum. A knife is used to create a pocket just anterior-superior to the acetabulum. A cobra retractor with a long lever arm is placed at this position to retract the femur anteriorly. Should there be resistance the reflected head of rectus femoris origin in this area may be incised to facilitate this step. With the external rotators and capsule retracted, a headed pin is now placed into the ischium just postero-inferior to the acetabulum. Another headed pin may be placed superiorly. A swab is placed into the soft tissue between the capsule inferiorly and the fat. This retracts the blood vessels from the obturator artery. A longitudinal incision is performed in the capsule to the level of the transverse acetabular ligament. A broad Hohmman retractor is placed inferior to the transverse acetabular ligament. This now provides a circumferential view of the acetabulum (Figure 2). The labrum is now removed along all soft tissues and the pulvinar.

Figure 2: View of the left acetabulum with retractors and pins in place. To the left of this picture at 9 o’clock is the inferior retractor placed inferior to the transverse acetabular ligament which is visible and used as a guide for the placement of the acetabular component.
The acetabulum is now reamed to accept the appropriate size. The uncemented acetabular component is then implanted with the transverse acetabular ligament as a guide for version. The appropriate abduction/inclination angle is achieved with an external alignment guide. This acetabular component may or may not be supplemented with screws. Either a trial liner or the definitive liner may be implanted. This is protected with a swab. All retractors are now removed and attention is now turned to the femur.
The femur is now placed in a position of internal rotation and flexion. The foot of the patient is now placed at the level of the assistant’s shoulder with the lower leg vertical. It is important to maintain this position to allow preparation and placement of the femoral component in the correct version. The femoral canal is prepared to accept the templated size with retractors applied to protect the gluteus medius muscle and the femur elevated during this step. Just prior to reduction, measurements taken from the tip of the greater trochanter to the shoulder of the trial and from lesser trochanter to the tip of the femoral head help in recreating the templated measurements. With the trial in place using the appropriate neck and trial head the hip joint is reduced. The offset can be judged with the length of the short external rotators against the edge of the greater trochanter from where it had been elevated. Soft tissue tension is tested using the “Shuck test” [8]. This test may have differences in reliability but does provide an assessment of soft tissue tension. Leg length is then assessed by placing the two limbs against each other at the level of the knee. Any discrepancy can be corrected at this point. Should there be an increase in leg length either a shorter head or further resection of the neck and repeat preparation is undertaken. Should there be a decrease in leg length an increase in head size can be trialed. Hip stability is now tested. A combined anteversion assessment is undertaken. The transverse marker on the femoral head is placed parallel to the edge of the acetabular component. The angle subtended between the lower leg and the table is measured, with a minimum of 30 degrees required for stability.
The definitive components are implanted and the hip is reduced. The tag/stay sutures are now passed through predrilled holes in the trochanter [8]. This is now tied to complete the repair of the posterior structures (Figure 3). Copious washout with normal saline is undertaken. The fascia lata is closed with interrupted and continuous sutures. The subcutaneous fat layer is closed in an interrupted manner while the skin is approximated in a continuous manner using a subcuticular stitch. Steri-strips are used at the end and the wound is covered with an impervious dressing.
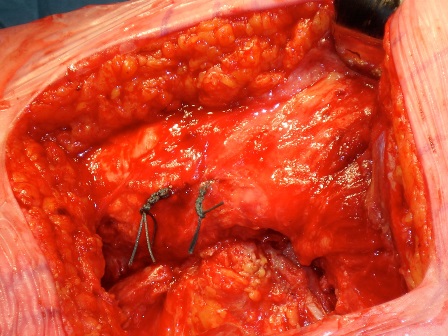
Figure 3: View of the left hip showing the re-attachment of the short external rotators and capsule using transosseous sutures.
- Moore AT: The Moore Self-Locking vitallium prosthesis in fresh femoral neck fractures: a new low posterior approach (the southern exposure). In AAOS Instructional Course Lectures.vol16, 1959:309-321.
- Mehlman CT et al: Hyphenated-history: the Kocher-Langenbeck surgical approach. J Orthop Trauma. 2000 Jan; 14(1): 60-4.
- Masonis JL et al: Surgical approach, abductor function and total hip arthroplasty dislocation. Clin Ortho Rel Res 2002,405:46-53
- The National Joint Registry 12th Annual Report 2015.
- Maggs JL et al. The Exeter Contemporary flanged cemented acetabular component in primary total hip arthroplasty. BJJ 98(b):3;307-312.
- Danninger T et al. Tranexamic acid and orthopedic surgery—the search for the holy grail of blood conservation. Ann Transl Med. 2015 Apr; 3(6): 77.
- Innomed Inc, USA.
- Takao et al. Reliability of Intra-operative Assessment of soft Tissue Tension in Total Hip Arthroplasty. 2012. BJJ Orthopaedic Proceedings 2012 94B (Supp XL) 131.
- Carrington NC et al. Surgical Approaches in Primary & Revision. In The Exeter Hip. 40 Years of Innovation in Total Hip Arthroplasty. 133-139.